

As you likely know, FBA stands for Fulfilled by Amazon… and is an *awesome* way to get more sales.
If you’re in Low Hanging System you know why: you’ve got the advantage of leveraging Amazon’s proven track record for fast shipping and excellent customer service, you qualify for Prime shipping, and your conversion rate will be a bit higher than without having the badge.
Some people are hesitant about doing FBA, though. It’s not what they’re used to and they think the learning curve might be steep.
In this post, I want to go over how you can get involved with FBA — step by step — to remove the guesswork and make sure you know exactly what to do.
This way you can start reaping the benefits of FBA without feeling nervous about doing it wrong.
That said let’s take a look at what you need to do to start creating FBA listings on Amazon (you’ll also find a section at the end about how to choose the best products to send to FBA).
Let’s get started…
You can watch the video below, or check out the written instructions, or both!
Adam’s FBA video
Adam is one of our Low Hanging System coaches and made a beautiful video you can watch and learn from:
And here are some written instructions:
Creating FBA listings on Amazon
There are two basic ways you can go about this…
- Case-packed – Shipping one product (e.g. 36 mugs) in a single box
- Individual units – Shipping a variety of products (e.g. a mix of mugs with different designs) in a single box
I’m first going to talk about setting up case-packed FBA items. Then, I’ll talk about individual units further down.
Case-packed
Inside Seller Central, go to Manage Inventory and choose the product you want to ship to Amazon.
You’ll first need to create a condition using that product. To do this, click the down arrow next to the item and choose Add another condition from the dropdown menu. This brings up a screen that looks like this:
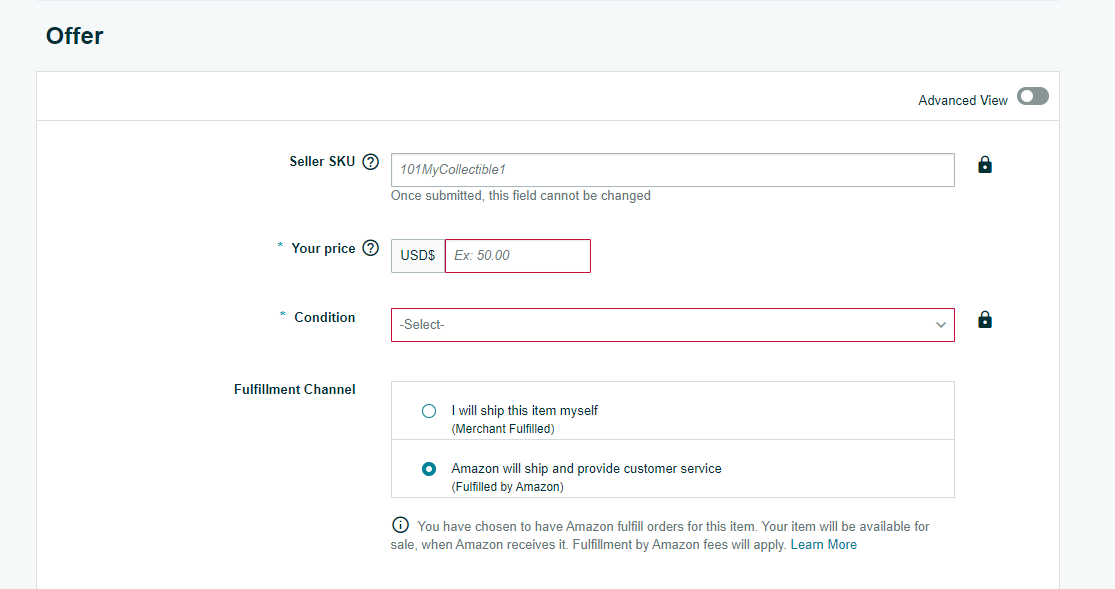
Seller SKU
I’d suggest going with something that starts with FBA and then has a number after — for example, FBA001.
If you don’t input anything here, Amazon will assign a SKU for you. But for organizational purposes, I find it helpful to use the formula FBA + number so you can tell at a glance the product is FBA.
Your price
You can input whatever works for the profit margin you desire here. But I often do either $18.95 or $19.95 for coffee mugs.
Quantity
If you see this box, leave it blank and switch the selected option next to Fulfillment Channel.
Condition
Select New.
Fulfillment Channel
Amazon will ship and provide customer service (fulfilled by Amazon).
Click Save and finish.
The next screen you see will be the shipment-creation screen. The very first time you go through this process, you’ll see this:
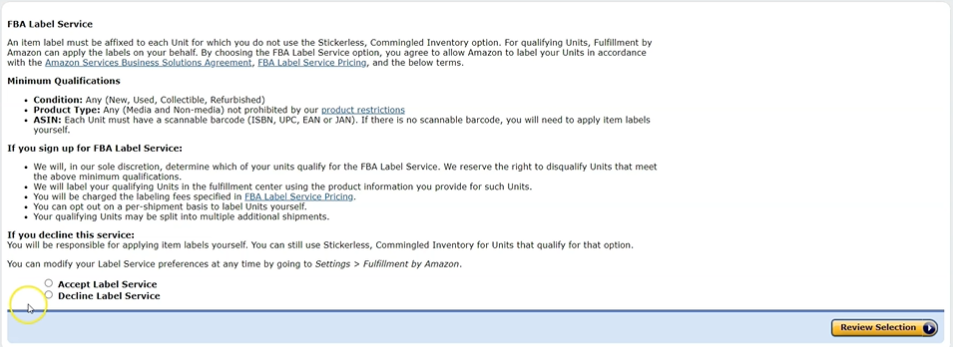
Choose Decline Label Service and click Review Selection. This just means that either you or a supplier, like CustomHappy, is going to apply the label stickers to your orders.
On the next page, click Confirm Selection.
Then, don’t worry about the next page. It basically says that all of your products are going to have an Amazon bar code (aka FNSKUs) on them. Click Save & Continue.
Next, you need to tell Amazon where your product is coming from. If you’re shipping from a supplier other than CustomHappy, you’ll need to input that supplier’s address. But if you’re shipping from CustomHappy, you can put the following:
United States
7900 North Radcliffe Street
102A
Bristol, PA 19007
Phone number: [your number]
Email address: you can leave this blank
When you’re done, click Add contact.
You can add multiple suppliers if needs be. Just always be sure to select the correct address depending on what’s being shipped so you get the correct shipping label.
The first time you ship a product, you have to enter some info about that product. For case-pack boxes, you need to create a case-pack template.
Case-pack template example
Packing template name
CustomHappy 11 oz box
Units per box
36
Box dimensions (inches)
21 X 21 X 21
Box weight (lbs)
32 pounds
Prep for each unit
No prep needed
Who labels units?
By seller
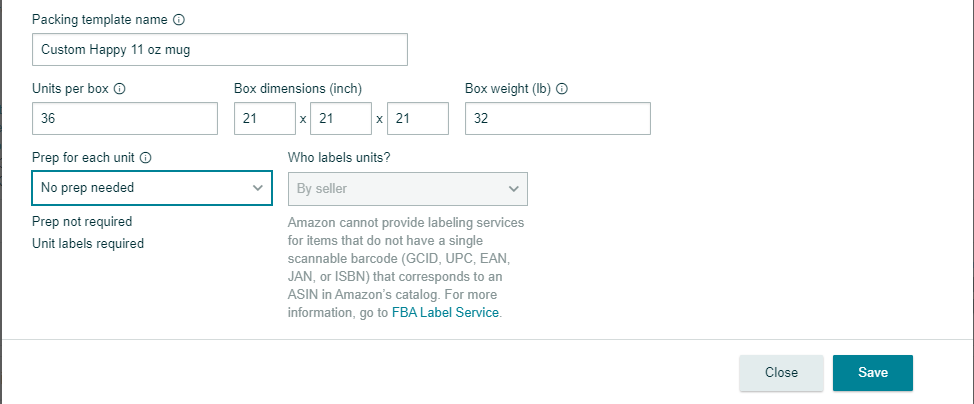
Click Save when you’re done.
When you do this, you’ll get the following error message (it’s okay):

Hit Close and refresh your screen. You’ll see the following under where it says Information/Action:
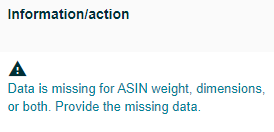
Click that text, fill in the form that pops up with the information provided below, then click Save.
Dimensions (inches)
6.25 X 5.25 X 5.25
Weight (lbs)
0.88
For FBA, there are two dimensions you need to specify (be sure not to mix them up):
- The dimensions of the actual product
- And the dimensions of the box the products are being shipped in
At this point, you have now added in both of those things.
After saving your product’s dimensions, refresh your screen again. You may need to enter the same information twice. This happens from time to time and it’s just Amazon being weird.
Once Amazon accepts your product information, specify the number of boxes you want to send. Usually, you just put one. But you can send multiple boxes at a time if you want.
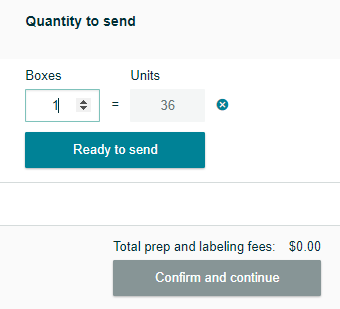
Click Ready to send when you’re done then Print all SKU labels. This doesn’t actually print the labels. It just downloads the label page, which looks like this:
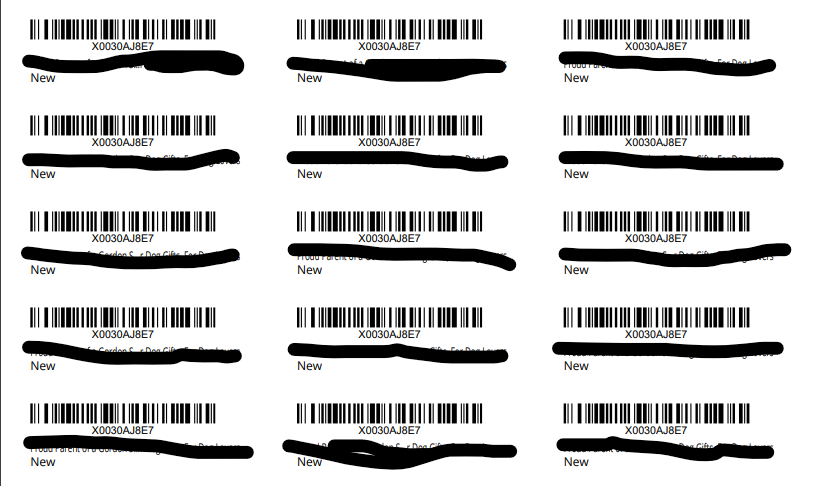
This is the page that gets printed in your supplier’s warehouse. Each sticker gets attached to one of the products in your box. Then, when Amazon scans this, they’ll know which product it is and they can assign it to a specific spot in their warehouse.
Back in Seller Central, click Confirm and continue.
On the next page, you’re going to confirm your ship date, which actually isn’t as important as you might think. If you’re doing normal Amazon shipping, with most suppliers, you’re going to ship the same day that you go through this process.
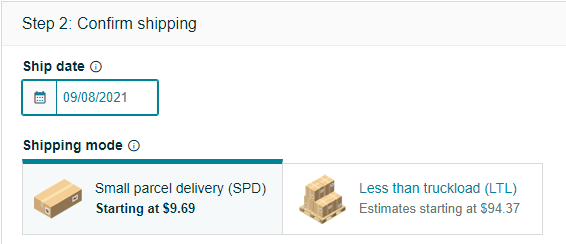
After confirming the ship date, you can ignore the rest of the information on this page.
It’s going to cost $9.69 to ship this box to Amazon. This is a discounted rate. You’ll see a similar cost for each FBA shipment you make to Amazon.
Accept the charges and confirm the shipping.
Once you’ve done that, you’ll be ready to order the product from your supplier (CustomHappy) who will get your box ready with your labels and then ship it to Amazon.
On the next page, you’re going to download your label. If you’re working with CustomHappy, you’re going to download the “Thermal Label” version of the shipping label. This should be the default option that’s shown on the screen.
Then, click Print and send that document to the CustomHappy warehouse along with your order.
The document will look like this:
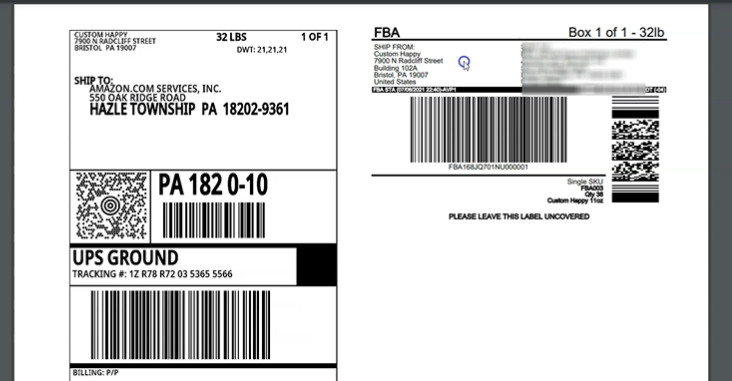
(NOTE: Depending on how it downloads, you may need to change the orientation of the label so it looks like what you see above.)
Pay attention to the label’s “Ship To” address. Amazon usually tries to find the closest address to where a shipment is coming from. So in most cases, a box being sent from CustomHappy’s address in Bristol, PA will go to Amazons’ address in Hazle Township, PA.
This isn’t always the case, though. So just be mindful of this, as you’ll need to tell CustomHappy this address when you enter your information there.
When you save and download your label, name it something that has to do with the product name or the person you’re ordering for and call it shipping labels. This helps for organizational purposes.
Back in Seller Central, you can click the Mark as shipped button if you’d like. This is optional.
Ordering items for FBA from CustomHappy
For LHS members, CustomHappy is your go-to supplier.
To place an order you need your design file. This is the file that you used to make your design, not a picture of the finished product. It’s the file that you uploaded to put on the product.
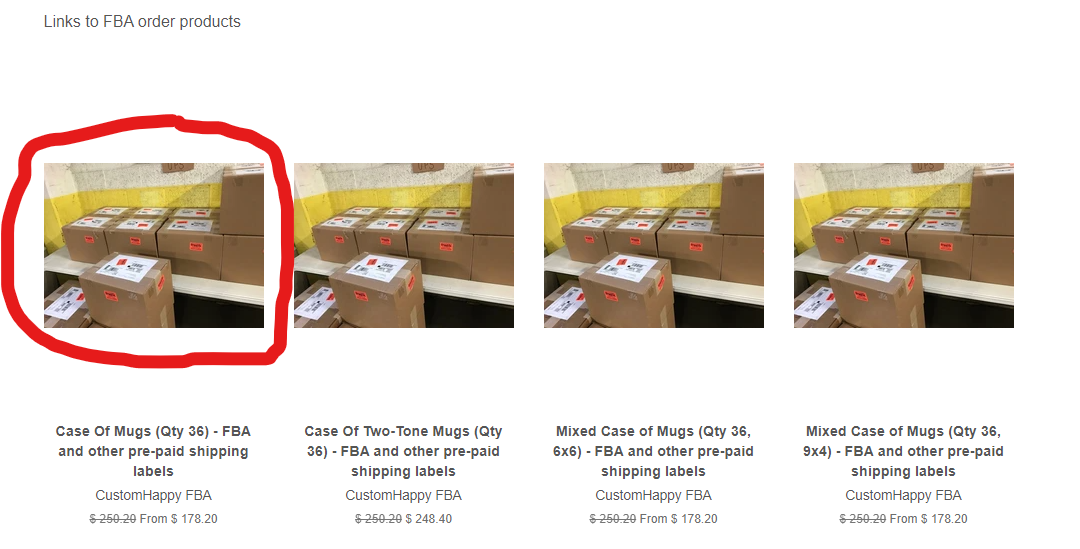
Go to CustomHappy.com, under the Shop tab, select FBA orders. For case-pack FBA, you’re going to select this option on the left (one design per box):
On the next page, click where it says Choose File then search for your design file on your device. I’d recommend doing this for both the front side and the back side. But you can put the design on just one side if you’d prefer.
You also need to upload the shipping and bar code labels that you created previously for this particular design. You need both of these files. The shipping label goes on the box that contains all of the mugs, and the bar codes label go on all of the individual products.
There will be a space provided where you can add any relevant instructions. Just leave it blank if it’s not applicable.
When you’re done, click Add to cart. Make sure everything looks okay then click Check Out.
On the next page, input the information from the label you downloaded from Amazon – the label with the Amazon address on it (e.g. Hazel Township, PA).
Where it says Delivery, you’re using the Prepaid Shipping Label you got from Amazon. You still have to input a credit card number along with your billing address. But if you have a discount code, you can input that and it won’t cost you anything.
When you’re finished, click the Authorize this purchase button, and you’re done!
Individual units
Now, I’m going to talk about individual units. This options means you have one box containing products with a variety of designs instead of all 36 items sharing the same design.
Whether you send a variety of products in a single box or just one type of product, you still have to create a condition, give it a SKU, and convert it to Amazon FBA.
Inside Seller Central, under Inventory, choose Manage Inventory. Then, select all of the items you want to put inside the box. Next, click the button that says Action on [X number] selected, choose Send/replenish inventory from the dropdown, and say Yes, continue.
The next page will look like this:
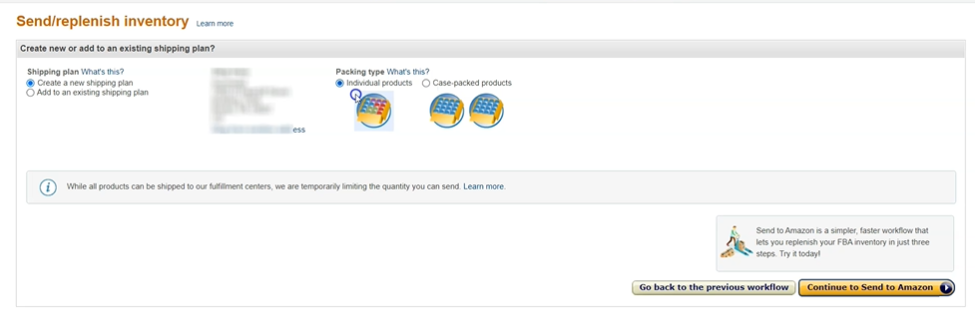
Here, select Create a new shipping plan and Individual products and click Continue to Send to Amazon.
On the next page, enter the dimensions of your box and products, the same way you do with case-packed items. The only differences are you’ll choose Individual units from the dropdown under Packing details and input the number of each item that’ll be in the box.
For example, if you include six different coffee mugs, divide the box evenly amongst the six different mugs. This gives you six units of each design (again, each box always comes with 36 units total).
Click Ready to pack when you’re done.
(NOTE: I like doing six different designs per box, as this lets you test more designs in one shipment.)
Next, click where it says Print all SKU labels and choose Print all. You’ll once again download your labels. Then, you’ll come back to Seller Central and click Pack individual units.
Here, you’re going to select the option that says Everything will fit into one box and click Confirm. Enter the box dimensions, which are the same as previously discussed. Click confirm packing information and then Confirm and continue.
On the next page, you input a shipping date and you’ll be given a shipping label to download, same as above.
(NOTE: Your labels may download sideways so you might need to change their orientation.)
The process for ordering these items from CustomHappy is also almost the same as previously discussed. The only difference is you’ll select one of the Mixed case of mugs options.
How to pick which items to send to FBA
The biggest question about getting involved with FBA is which items should you choose. There are two easy (and free) methods that can help…
1. Choose evergreen items that are already selling on Amazon
Look at your sales and see which items are selling well. And of those items, select those that are evergreen or timeless.
For example, if you have a political mug relating to President Biden or Vice President Harris, those types of items have a shelf-life. They are not going to be topical forever.
You want to choose items that don’t have a shelf-life, that people would love to buy anytime. This also rules out any designs about specific holidays.
2. Look at items that are selling well on Etsy
Etsy tends to be a little bit easier to break into than Amazon. So you can use your experiences on Etsy to help inform your actions on Amazon.
Look at your top-selling Etsy items, especially those that are selling consistently well (i.e. not those that only spike around certain times of year). Then, see how those Etsy winners do with FBA. You may see similar results!
I hope this helps make the process of selling Amazon FBA easier. If you’re an FBA seller and you have any advice that you can share, please leave a comment below. Also, if you enjoyed this post, please consider sharing it with your friends and followers.


5 thoughts on “How does Amazon FBA work? An updated guide”
It is stating THERE IS AN ERROR IN MY CHOICE OF CARRIER? I CANNOT FIGURE THIS OUT.
Select shipping carrier
?
We encountered an error with your carrier selection. Try creating a shipment again in a few minutes.
UPS (Amazon partnered carrier)*
Hey Marie,
Try refreshing your screen and trying again a little later. :) Please email rachelreports@gmail.com if you continue to have issues. Thanks!
VERY INTERESTING.
ITS. PRACTICAL. DIFFERENT. OF. OTHERS.
THANK YOU
Hi Rachel!
Are you still using gear bubble to drop ship products at this point or have you switched? I have read conflicting reviews about them & would love your input. :)
Thanks so much,
Samantha
Hey Samantha, Thanks for your question! Please email rachelreports@gmail.com and they will be able to answer your questions. :) Thank you!