
Gmail recently made some updates that affect big sellers and small business owners on Etsy who have email lists. Not all Etsy sellers have email lists, and you absolutely do not need one to succeed. But for any LHS sellers with lists who want to improve their email open rates and consequently drive more traffic and sales, it’s important to learn more about Gmail’s changes.
Gmail’s changes affect any entrepreneur who sends emails using a third-party application like ConvertKit, which is my preferred email marketing platform. Since Gmail made these updates, I’ve noticed a significant drop in my emails’ open rates. Lower open rates mean fewer opportunities for people to click my links, visit my shops, and buy my products.
Gmail’s updates can significantly impact sellers’ businesses, especially big sellers but also small business owners who rely on email marketing. Gmail’s updates aren’t just recommendations. These updates need to be followed if you don’t want your emails to bounce or end up in spam.
I want to help you get the most out of your email marketing campaigns. So, below, I talk more about what’s been going on with Gmail and share practical tips and solutions to keep your email open rates high.
Let’s take a look…
Here’s an overview of Gmail’s latest updates
As of February 2024, Gmail implemented its new requirements for bulk email senders. (You’re considered a bulk sender if you have a sending volume of at least 5,000 emails in a day.) Here’s what Google has to say about these updates:
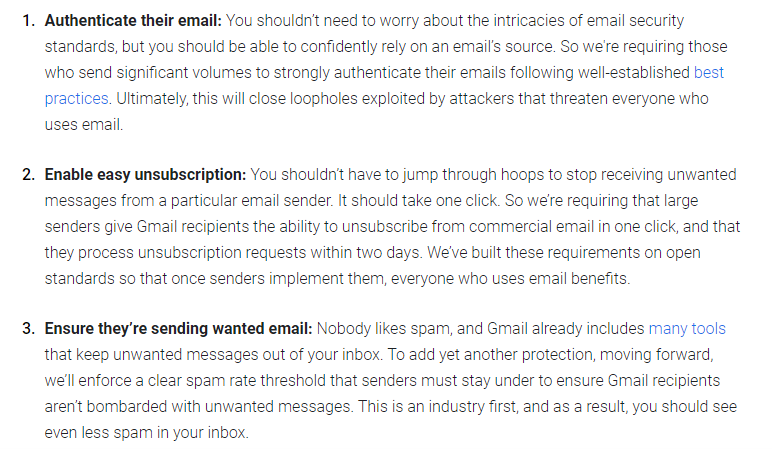
Email abuse is a real problem. And Gmails updates are intended to make email safer and more secure.
To meet Gmail’s requirements, big sellers and small business owners need the following…
- A verified sending domain
- A DMARC record set to “at least” p=none
- To keep their spam complaints below 0.3%
Verified sending domain (VSD)
Having a verified sending domain means you’ve set up authentication records (SPF, DKIM, and DMARC) with your web host. This tells email providers like Gmail and Microsoft that you’re a legitimate business and that email providers like ConvertKit can send emails using your domain on your behalf.
How to enable your VSD on Convertkit
To set up your verified sending domain in ConvertKit, first, click on your account name at the top right of the dashboard, then select “Settings.” Next, click on “Email” in the left sidebar.
In the “Verified Sending Domains” section, click on “Set up your verified sending domain.” If you’ve already added a verified sending domain, click on “Add a Verified Sending Domain” instead.
Enter the domain you want to verify for sending (remember, you can’t use a subdomain), and click “Next.”
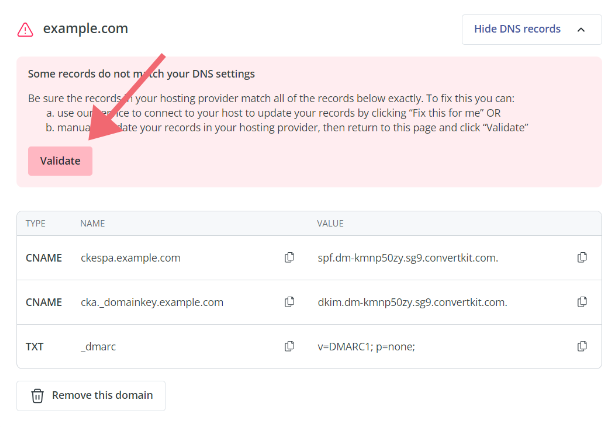
Click on “set this up for me” and follow the prompts. You may need to know who your DNS host is and have the login information for that account.
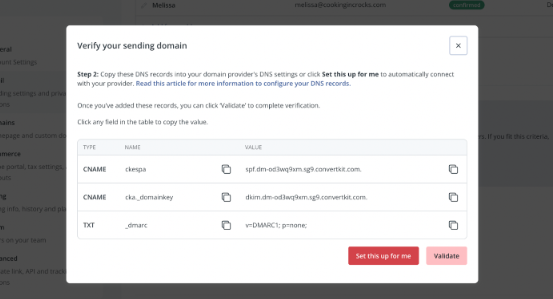
A pop-up for Entri will appear. Then, click “Continue.” Entri might automatically detect your DNS provider for you. If not, you may need to locate your DNS provider yourself. Once you’re logged in to your DNS provider, Entri will start configuring your domain.
Next, you’ll see a pop-up asking you to log in to your DNS provider. Once you’re logged in, Entri will start configuring your domain.

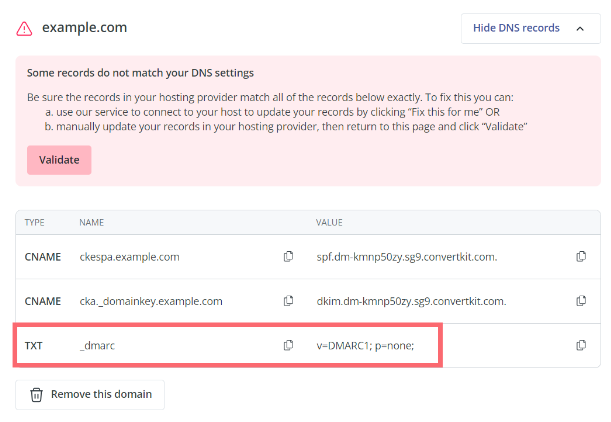
After configuring your domain, you might need to click on “validate.” This process could take a few minutes, so be patient and allow the system enough time to update the changes.
DMARC record
Low spam complaints
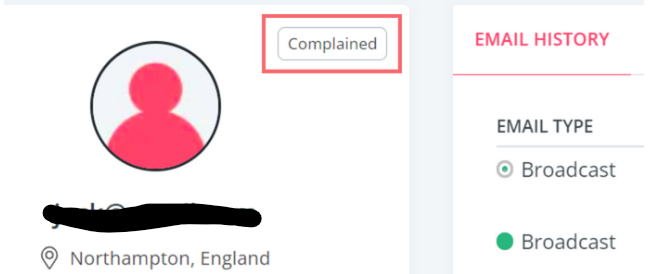
Occasionally, subscribers complain. When a subscriber marks one of your emails as spam or junk, they are classified as “Complained” on your list. Subsequently, they will no longer receive your emails. This “Complained” status is visible in the subscriber’s profile, located above their email address to the left of Email History.
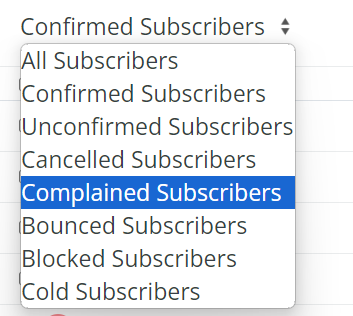
You may also see “Complained” when you look for a subscriber on the “Subscribers” page. Lastly, you can use the dropdown menu on the “Subscribers” page to filter for subscribers who have registered complaints.
To identify the email a subscriber marked as spam, go to the profile of the “Complained” subscriber. Then, check their Email History. This section displays the subject lines of emails you’ve sent to them, with the spam-marked email showing “Complained” below its subject line. If big sellers and anyone who practices small business ownership notice a high number of complaints for a specific email, they may need to revise their content strategy or subject lines.
Practical tips to help big sellers and small business owners navigate Gmail’s changes
Two of the fantastic developers I work with, Josh and Kyle, have weighed in with some tips and solutions that will help you successfully navigate Gmail’s latest updates.
Create a high-quality segment in ConvertKit
Creating a high-quality segment in ConvertKit involves defining criteria that identify subscribers who are highly engaged or meet specific characteristics relevant to your goals. Here’s a step-by-step guide:
Identify your criteria: Determine what defines a high-quality subscriber for your purposes. This could include factors like engagement level (e.g., opens, clicks), purchase behavior, subscription preferences, or course enrollment.
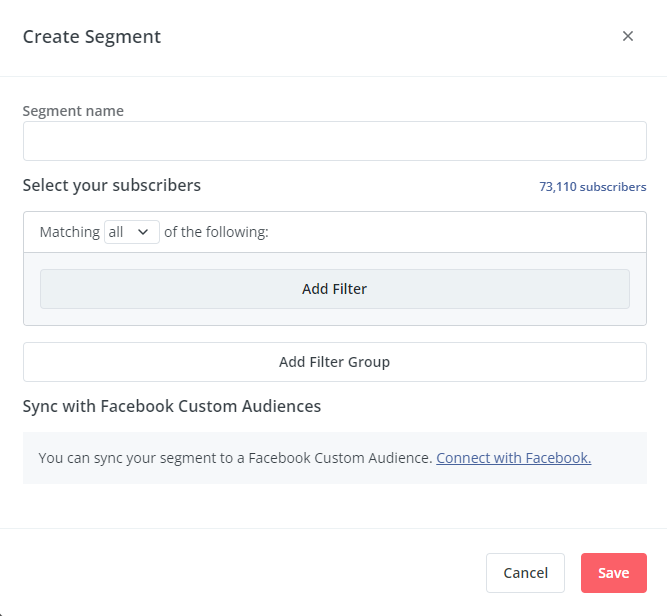
Create a new segment: Inside ConvertKit, go to the “Subscribers” tab. Then, click on “Create s Segment” and fill out the new segment form with the relevant filters and hit save.
Use your segment: With your high-quality segment created, you can now use it to target these subscribers with specific campaigns, offers, or content that aligns with their interests and behavior.
Deliver higher quality content
Personalize your emails: Use merge tags to personalize your emails with subscribers’ names, locations, or other relevant information. Personalization can help increase engagement and make your emails feel more tailored to each recipient.
Focus on value: Big sellers and small business owners should provide valuable and relevant content that addresses their subscribers’ needs, interests, or pain points. Whether it’s educational content, product updates, or exclusive offers, ensure that your emails offer something of value to your audience.
Use clear and compelling subject lines: Your subject line is the first thing subscribers see. So make it engaging and relevant to increase open rates. Avoid using all lowercase letters and excessive punctuation. These elements can decrease your emails’ perceived quality.
Optimize for mobile: Ensure that your emails are mobile-responsive and display correctly on various devices. Most subscribers read emails on their phones. So you need to optimize for a seamless mobile experience.
Maintain brand consistency: Keep your emails consistent with your brand’s voice, style, and values. This helps big sellers and small business owners build brand recognition and trust with their subscribers.
Avoid spam triggers: Big sellers and small business owners should avoid using spammy language, excessive emojis, and misleading subject lines. These things all can trigger spam filters and reduce your emails’ deliverability.
Analyze past broadcasts for successful content
Analyzing past broadcasts in ConvertKit can help big sellers and small business owners identify successful content and insights to improve their future email marketing campaigns. Here’s how you can analyze your past broadcasts for successful content:
Access broadcast reports: Log in to your ConvertKit account and navigate to the “Broadcasts” tab. Click on the broadcast you want to analyze to open its details.
Review performance metrics: Look at key performance metrics such as open rates, click-through rates (CTR), and conversion rates. Identify broadcasts with above-average performance metrics as potential successful content.
Compare performance over time: Compare the performance of your broadcasts over time to identify trends or patterns. Look for improvements or declines in performance that can help you refine your email marketing strategy.
Repurpose successful content: Consider repurposing successful content in future broadcasts or campaigns. This could include reusing subject lines, content formats, or messaging that performed well in the past.
Use A/B testing: Conduct A/B tests on different elements of your broadcasts to further refine your content strategy. Test different subject lines, content formats, or calls to action to see what resonates best with your audience.

Include a prominent unsubscribe link
Including a prominent unsubscribe link in your ConvertKit emails provides recipients with an alternative way to opt out of your email communications, which can reduce your spam rating.
How big sellers and small business owners can create a custom unsubscribe link
Go to your ConvertKit account and navigate to the email editor for the email you want to add the additional unsubscribe link to.
Type out the text you want to use for the additional unsubscribe link (e.g., “Unsubscribe from all emails”). Highlight the text and click the link icon in the editor toolbar.
In the link settings, paste the following URL: {{ unsubscribe }}. This will create a custom unsubscribe link that allows subscribers to unsubscribe from all emails.

Position the unsubscribe link in a prominent location in your email, such as at the top. Then, test the unsubscribe link to ensure that it works correctly and unsubscribes you from the email list.
Add a note reminding subscribers why they are on your list
Adding a note to your emails reminding subscribers why they are on your list reinforces their connection to your content. Plus, it reduces the likelihood of unsubscribes.
Craft a brief, personalized note that reminds subscribers why they are receiving your emails. For example, “You’re receiving this email because you signed up for our weekly newsletter with updates on industry trends and exclusive content.”
Insert the note at a strategic location in your email template, such as near the beginning or end of the email. Keep the note brief and to the point to avoid overwhelming subscribers with unnecessary information. And use friendly and engaging language to maintain a positive relationship with your subscribers.
Based on Gmail’s recent updates, I encourage big sellers and all types of small business owners to implement the tips and solutions shared here. That way, their emails will be less likely to end up as spam. They can increase their open rates. And big sellers and small business owners alike can make good money.
I hope you find this post useful! If you have any other suggestions or tips for small business owners and big sellers about these updates, please leave a comment below. Being a small business owner can be challenging. So if you enjoyed this post, consider sharing it with your fellow entrepreneurs and followers.