

Many people aspire to earn a full-time income from selling print-on-demand, but they may not know how to increase sales on Amazon. If you aren’t getting many sales, you may feel confused or frustrated and like you’ll never reach your goal.
If this describes your current situation, then this post is for you.
Below, we’re first going to go over some general low-hanging tips. Then, we’ll dive into some specifics about how to increase sales on Amazon.
So, first, for low-hanging style designs…
Simplify your designs and create more products
To make your first sale on Amazon, I highly recommend simplifying your designs and creating more listings. Simple designs have the most widespread appeal; plus, they’re easier to create. And each new listing you make serves as another opportunity for customers to buy from you.
How to simplify your designs
If your designs contain multiple fonts, colors other than black, and images, you’re making them too complicated. Every new element you add to your designs gives shoppers a reason not to like them. If they don’t like all of the fonts you chose, your color schemes, or your images, they are going to click away and buy from another seller.
Your goal is to create designs that have mass-market appeal. That means all you need for a successful design is readable black text on a white background. Most shoppers won’t find anything to dislike about a simple, black text.
Then, when it comes to the content of your designs’ text, you want to come up with phrases that have specific buyers in mind. Amazon has a buyer search engine, and shoppers search for things like “mug for husband” and “guitar player mug,” not “random abstract mug.” So you want to create designs based on what shoppers want. Otherwise, they won’t find or be interested in your listings.
How to create more listings
Creating more listings doesn’t have to mean coming up with more design ideas. Often, you can come up with design templates in which you can swap out a few words and mass-produce a ton of different products in a variety of niches. For example, if you have the design template “All _____ are sexy,” you could fill in the blank with…
- All guitar players are sexy
- All doctors are sexy
- All bull riders are sexy
- All Bostonians are sexy
- etc.
That way, you can create a ton of new designs without much effort.
I have a “Master List” of hobbies, professions, musical instruments, animals, and more that you can use to make this process even easier. You can check it out here.
Re-optimize your product listings
If you haven’t made any sales on Amazon, you may need to re-optimize your listings. And what that comes down to is improving your product descriptions and bullet points, adding engaging photos, and making sure your titles contain relevant keywords.
Your product descriptions
Your Amazon descriptions should be clear, concise, and to the point. They should highlight your products’ features and benefits. A good rule of thumb is to start each bullet point with one of your product’s features and then say what the benefit of that feature is. Your bullet points should naturally contain keywords but you don’t want to keyword stuff (your bullet points should read naturally and clearly).
To learn more about effective description writing, click here.
Your product photos
Since Amazon is an ecommerce platform, customers rely on product photos to make their buying decisions. So you want to include multiple, high-quality photos that help sell your products to your customers.
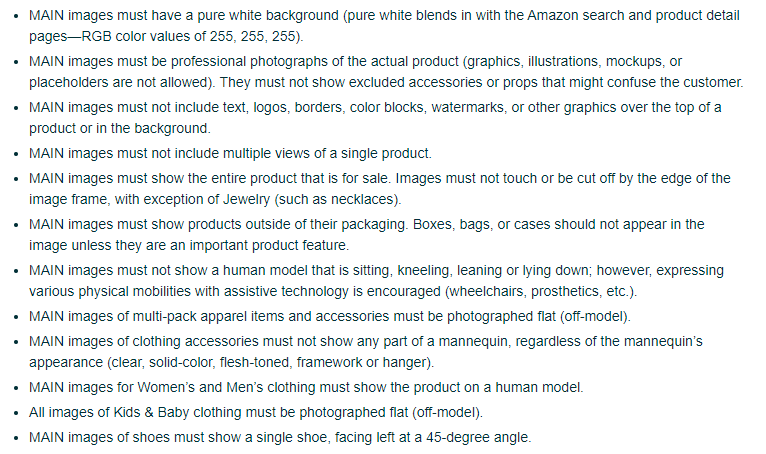
Your main Amazon image needs to be set against a white background and have your product fill the majority of the frame. Your additional images should show your products from a variety of angles, and you should also include some lifestyle images that show your products in use. That way, customers can get a feel for what it would be like to own your products.
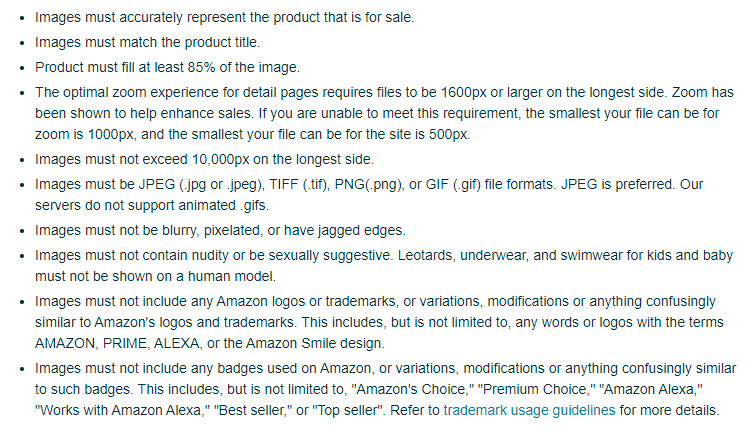
Below, you’ll find some additional guidelines that Amazon puts forth about your product images.
All Amazon images
Main Amazon image
To get great photos for your Amazon listings, you don’t have to look far, fortunately. If you’re a Low Hanging System member, you get access to tons of product mockups, including both general and holiday-specific lifestyle mockups. To find those, simply run a search for “product mockups” on my website.
Your product titles
When creating your product titles, you need to think like your customers. Your customers aren’t going to search for your products based on what your designs say. Rather, they are going to search for niche-related phrases, such as “funny knitting mug” or “shot glass for dad,” and these are the types of phrases you want to include in your titles.
Additionally, Amazon has other requirements and tips for creating awesome titles that you want to pay attention to…
Title requirements

Title tips

Add new niche topics to your shop to attract buyers
If you’re having trouble attracting buyers to your shop, one thing you can do is add new niche topics. This could include adding items related to popular trends, seasonal events, or specific interest groups.
Adding new niche topics to your shop will not only help you attract more buyers, but it will also allow you to earn more money. This is because you’ll be able to reach a wider audience of potential customers and sell more items.
In my experience, you don’t need to come up with a ton of designs for every niche you’re in. Rather, you can create one or two designs for a variety of niches and test which niches earn the most sales. Then, once sales start coming in, you can dig in and create more designs for your most profitable niches.
You can get niche ideas using my Master List.
And then for Amazon-specific things you can do, you can…
Review your shop’s metrics and look for ways to improve
As an Amazon seller, it’s important to continuously look for ways to improve your business. One way to do this is to examine your shop’s metrics. This will help ensure that your business is always running smoothly and efficiently.
The top metrics I recommend paying attention to are:
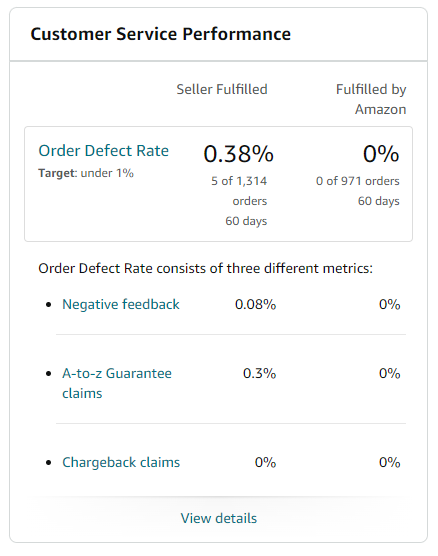
1. Order defect rate (ODR)
Your ODR represents the number of customers who had a negative experience with your shop. Representations of negative experiences include things like getting negative reviews or feedback, customers requesting refunds because they were unsatisfied, and receiving A-to-Z claims if orders aren’t timely or arrive damaged.
Monitoring your ODR is important because a high score can result in your account being suspended. You want to keep your ODR below 1%. If your ODR rises above 1%, you have 17 days to tell Amazon your plan to lower your score and improve customer satisfaction to avoid suspension.
You can find your ODR inside Seller Central by clicking on “View Account Health.” Your ODR is located under Customer Service performance.
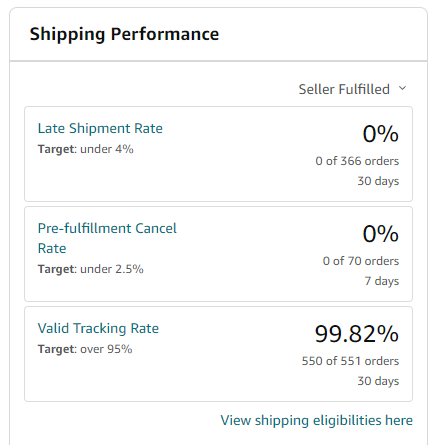
2. Late shipment rate
Amazon prides itself on customer satisfaction. And one of the most appealing aspects of shopping on Amazon is fast and reliable shipping. So Amazon doesn’t take kindly to sellers with high late shipment rates. Amazon considers late shipping to be anything longer than two days over your set shipping rate. To keep your account in good standing, you need to maintain a late shipment rate below 4%.
To find your late shipment rate inside Seller Central, click View Account Health. Then, look to the right under where it says “Shipping Performance.” There, you’ll find your late shipment rate along with your pre-fulfillment cancel rate and your valid tracking rate.
3. Unit session percentage rate (aka your conversion rate)
Your unit session percentage rate is one of your best indicators of how well your listings are performing. Amazon calculates this rate using the following formula: total number of conversions / total number of sessions * 100.
NOTE: Amazon looks at sessions, not visitors. Sessions refer to the number of times a single visitor looks at your shop. For example, if a person visits your shop three times, that’s one visitor but three sessions. Amazon shops typically have slightly higher session rates than visitors.
To find your ASINs’ unit session percentage rates inside Seller Central, click the Reports tab and select Business Reports from the dropdown menu. Then, scroll to the By ASIN section and click the line that says Detail Page Sales and Traffic by Child Item. This is where you’ll find your Amazon listings’ unit session percentage rates.
You can adjust the date range depending on the timeframe for which you want to look at unit session percentage rates. For example, you might want to look at these rates for the last year. In which case, you’d click each of the calendars next to where it says From and To, select the appropriate dates and hit enter.
In the report, the two columns you want to look at are our unit session percentage and sessions.
I recommend sorting your unit session percentage column in descending order. That way, you’ll be able to see your ASINs with the highest unit session percentage rates at the top.
After doing that, you want to look at the Sessions column. To get the most accurate picture of which of your ASINs convert the best, look at ASINs with over 1,000 sessions. That way, the unit session percentage rate is more likely to be statistically significant and trustworthy.
According to SellBrite, the average Amazon unit session percentage rate is 12.3%. Your goal should be for your ASINs to have the highest unit session percentage rate possible. But you can use the average rate as a benchmark. If your ASINs are above 12.3%, you can feel good about their performance. But if they fall below 12.3%, you may want to try to improve their performance by doing the following:
- Getting more positive reviews
- Adjusting your pricing
- Improving your image quality or adding more images
- Writing more compelling, benefit-driven bullet points and descriptions
4. Inventory performance index (IPI)
If you sell FBA, your IPI score gauges how efficient you are at selling through your FBA inventory over time. It’s calculated using the following formula: total units shipped during the last 90 days / number of units in FBA during the last 90 days.
The average IPI score ranges from 400 to 800. Ideally, you want to aim for a score above 550. If your score falls below 350, your IPI storage may be limited leading to overage fees.
To find your IPI score in Seller Central, click Inventory and select Manage Inventory from the dropdown menu. Then, click Inventory Dashboard. A new window will pop up showing your Amazon IPI score on the far left.
To learn more about the top factors that influence your IPI score along with what you can do to improve your score if it’s low, click the link below:
Here’s how I raised my Amazon Inventory Performance Index score 56 points in one month.
I hope this post helps you learn how to increase sales on Amazon. If you have any other tips you’d like to share, please leave a comment below. And if you enjoyed this post, please share it with your friends and followers.
And of course, if you’d like to learn more about how to make as many ecommerce sales as possible, click through to learn more about my Easy POD Mastermind!

1 thought on “How to increase sales on Amazon (even if you’ve had a slow start)”
thanks